Scripts for sticky situations (New Insider's Guide)
I’m really excited to announce a fifth title to my series of Insider’s Guides for New Organizers. This one, called Scripts for Sticky Situations with Organizing Clients provides suggested scripts for 20 different situations you might encounter with organizing clients.
Each scenario has at least two suggested scripts, which are designed to prepare new organizers so that these situations will be less awkward. In 13 years of business, I’ve navigated all these situations without a map. I’m hoping this guide will help you handle these situations without stress if you encounter them.
Topics include:
- Clients home is too cluttered or squalid
- Client could benefit from a therapist
- Client isn’t letting go of enough
- You’re not making fast progress
- You’re raising your rates
- Client is dissatisfied
- Client is not a good match
- Client’s check bounces
- Prospective client balks at your rates
Plus 11 more!
Insider’s Guides for New Organizers are concise, downloadable pdfs that sell for $9 each. This new guide is 17 pages.
Click here to purchase!
Using Trello for task management
I’ve known about Trello for years. My weird location-based memory allows me to remember exactly when I learned about it, from a client: May 20, 2013. That day, I glanced at the website, accepted her enthusiasm for it, but for some reason dismissed it. (I was probably enamored with another system at that moment.)
Of course, Trello has come up many times since but it’s only been this month that I started playing with it. I don’t know what took me so long, since Trello has so many things I like:
- It’s beautiful
- It allows me to use a kanban-style board
- I can drag items around it
- There’s an app so it’s always with me
- It’s extremely flexible
- It can also be extremely simple
- I can embed information and deadlines into notes but they’re not in my face
- It’s free!
Trello consists of boards (you can have many boards) that contain a series of lists, organized in columns. The lists contain notes. That simple format is extremely flexible.
So far, I’ve created a few Trello boards for task management. One has tasks by category (each list is a category). One has the day’s tasks, organized kanban-style, with lists called Tasks, Doing, and Done. Right now I’m playing around with having an hourly task board where I select the tasks I’ll be doing in the next hour (each time slot is a list) with the first list being all the day’s tasks. The idea is that it can provide structure on those days I’m working at my desk all day. I have a board that allows me to categorize tasks after the fact, so that I make sure that I’m doing things that help me, my family and the world every day. Here’s a screenshot of that board. (I call it my Do Good Task Board.)

One beautiful thing about Trello is its beauty. When you create a board, you can select from a wide variety of background images (or you can just have a solid color as a background). I like that it’s very easy for me to distinguish one board from another if you have more than one open, like I usually do. The images, in general, are peaceful and lovely. The format is simple.
Earlier this year, I was using Todoist, a very robust task app. But I quickly got overwhelmed and it became scary to even look on the tasks on that list. So it’s on ice for the moment.
On our podcast, Getting to Good Enough, Shannon Wilkinson and I recorded an episode on task management (Episode 6). We talked about various ways we track tasks and emphasized that there’s no such thing as a perfect way to do it. Both Shannon and I confessed that Todoist had gotten out of hand for us. Shannon has since told me that she regained control of Todoist and is enjoying it. But I’m experimenting with Trello, which seems simpler and more flexible to me. I’ll keep you posted on my progress with it!
Getting past "I might need it some day"
One of the most common reasons folks (including me) tend to hang to items that they use or love is that they feel they might need it at some point in the future and they fear regretting that they let it go. If you live in a home with plenty of storage space and you’re organized enough that you can find the item when you need it, then this might be no big deal.

But if your home is crowded with “I might need it some day” items, or you don’t have any systems in place to allow you to store the items where you can find them again, you might want to consider asking yourself these questions to get past that barrier:
- What are the chances I’ll need it?
- Will this item likely be the best choice at that time (considering that clothing goes out of fashion, technology becomes obsolete, books go out of date)?
- Would I be able to buy a new one if I did end up needing it?
- What’s the worst that could happen if I did find I needed an item that I had I let go?
- What’s more expensive: replacing the item down the road or hanging on to it indefinitely?
That last point is particularly potent when you pause to consider the cost of keeping stuff you don’t need or love. When your home is crowded with unloved or unused items, it often makes it harder to find the stuff you do love and use. There’s a physical and emotional cost of keeping unwanted items “just in case.”
Sure you might need that item in the future, but if what you need now is more space and order, then perhaps letting it go is the most beneficial course of action. I’ve been a professional organizer for 13 years now and I’m constantly reminded that our lives become so much easier when we let go of excess.
Getting my desk under control
Last week, my desk got out of control. I had a leather in tray that was overflowing, despite my having gone through it recently. I had a busy client week and spent what time I was at my desk dealing with urgent items. Look how bad it got. (I’m not proud of this picture.)
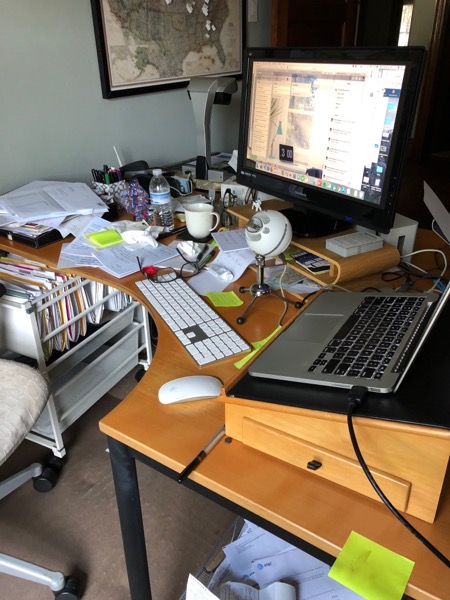
So yesterday I decided I needed to get serious about my desk. It took me a couple of hours, but here’s how it looked this morning:

It’s so much easier to think about getting work done when I have a clear desk!
Here’s how I went about doing it:
- I cleared all paper, even the stuff I was storing in my desktop riser, off the desk into a container.
- I (permanently) removed the leather paper tray.
- I made sure a trash can and recycling bin were nearby.
- I started going through the items in the container, tossing many papers and filing others in clear project view folders.
- I organized a couple of current move projects on a clipboard for easy use on site.
- I scanned a few papers and tossed them.
- I used a medium Multipurpose Bin from The Container Store (which I had on hand) to contain the project files and project clipboards.
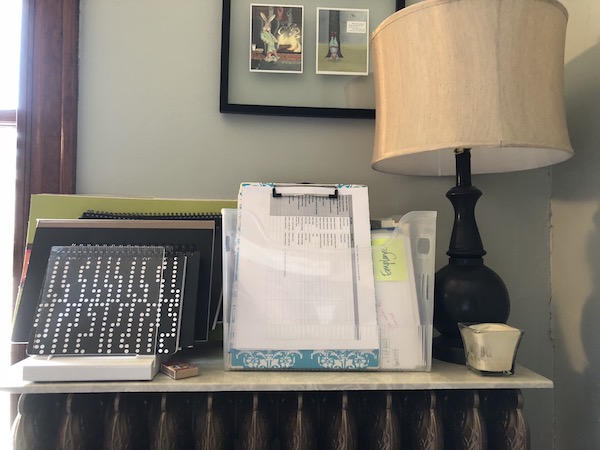
To keep my desk more clear, I placed the multipurpose bin on top of the radiator behind my desk. That way the files are handy, but not in my way. When I have a little more time, I think I’ll clean out the rolling file cart under my desk to make room for those project files.
Here’s a picture of that action bin. It makes the radiator more crowded than I’d like (next to it are notebooks I like to keep close at hand), but I think it’s going to work.
It’s so easy for me (and my clients) to let stuff clutter up a desk unnoticed until it’s out of hand. It feels really great to have taken a little time to focus on my desk. My intention this week is to put everything away before closing up shop for the evening (which was part of a wonderful evening routine I had back in the day). I think it’s going to make for a highly productive week!
Ten things I know are true
I started Peace of Mind Organizing® in July 2005. When I made this big transition from being a writer, I strongly suspected it would bring me happiness. (You can read about why I became a professional organizer, if you’re interested.) What I didn’t know then is how much I would learn and what a life changing profession it is. On my tenth anniversary, I reflected on ten truths I’ve learned as an organizer. I want to share them again today on the occasion of my 13th anniversary.
Thinking about my anniversary, I took a moment to write down ten things I’ve learned as a PO that have been proven true over and over again. I thought I’d share them with you this month.
- The less stuff you own, the easier your life is. Less stuff = more freedom.
- Relationships are more important than things. Don’t let your stuff get in the way of your relationships.
- There is no such thing as perfectly organized. Strive for “organized enough” instead.
- You can’t put something away unless you have a place for it. And you can’t have a place for it if you have more stuff than you can comfortably store.
- It’s easiest to create a new habit if you pair it with something you’re already doing. Use that trick to let habit creation be easy.
- Indecision leads to clutter. Make it a habit to decide immediately what to do with items.
- It’s okay to ask for organizing help. In fact, it can be very beneficial.
- Messy does not equal disorganized. I’m living proof.
- Tidy does not equal organized. I’ve seen many neat but disorganized spaces.
- You are not your stuff. Don’t let your stuff (and your ability to organize it) define you.
Worth repeating: Have that difficult conversation
Three years ago, shortly after my mother passed away on June 17, 2015, I wrote a post about helpful it was that we had talked about what kind of arrangements she and my father would like after their deaths. The workbook we’d filled out was invaluable and since then my father and I have gone through it again to make sure it’s up to date. The issue is so important, I thought I’d share the post again today.

My mother, Betty Sue Brown Adams, passed away on June 17, 2015. She’d been living with Parkinson’s Disease for years and the end of her life was swift and peaceful. My father, brothers, and I took great comfort in that.
One other source of comfort was the pre-planning we did back in 2006, when my mother was 73 and relatively healthy. I had just taken a two-day estate organizing workshop from Jeanne Smith of Exit Stage Right. One day was on helping people organize their affairs prior to death. The other day was on helping people organize after the death of a loved one.
That workshop was in California and I headed straight up to Walla Walla, Washington, to visit my parents. I asked them to help me in my training by going through the pre-death organizing process. The conversations were actually pretty easy and, believe it or not, we had a little fun going through the Exit Strategies workbook that Jeanne created and sells.
Nine years later, that planning paid great dividends after my mother passed away. That very night, we pulled out the workbook and pored over the pages in which my mother had specified her desires for the details of her memorial service (down to the flowers and music), burial, and obituary.
Those pages were absolutely invaluable the day after my mother’s passing, when my father and I went to the funeral home. We did not have to speculate what my mother would have wanted. And thanks to the workbook, the obituary practically wrote itself.
The workbook also provides a handy checklist of things to do after a death, as well as people to inform.
My father and I have agreed to go through the workbook again and make sure his desires and other information (like his financial account information) are up to date.
I urge you to consider discussing these details with your loved ones. Jeanne’s workbook is a terrific tool, but any information you gather will be helpful. It can be a difficult discussion to have, but it’s much easier to have it while folks are healthy. Since my mom died, my dad has expressed over and over how grateful he is that we did it. (I overheard him on the phone brag to someone that they worked with a professional organizer to do this planning.)
The pre-planning we did made a difficult time much easier. It’s yet another way being organized can be beneficial.
True independence
Here in the United States, it’s Independence Day. That got me thinking about what independence means to me.
A few years ago I created a little graphic to declare what I think brings true freedom.

I’ve been helping people gain that independence for thirteen years. The longer I do this work, the more sure I am that we’re all better off when we surround ourselves with less.
Photo by Paul Poli via Flickr.
Links
- Ravelry
- Organize Your Family History
- Are you interested in becoming a professional organizer?
- NAPO St. Louis
- Shannon Wilkinson, life coach
- National Association of Productivity and Organizing Professionals
- Getting to Good Enough podcast
- Peace of Mind Spending
- Institute for Challenging Disorganization

