Need some pro moving tips?
Moving can be overwhelming and confusing. Here’s some help: HireAHelper, a clearinghouse for moving-related services, asked a dozen professional organizers for their best moving tips. The result? A robust, helpful blog post for those planning a move. I was delighted to be one of the organizers consulted.
Check it out here:
We Asked 12 Professional Organizers How They Made Their Moves Easier
And if you’re moving to from or within in St. Louis, check out our moving services on the Operation: Relocation page.
2020 highlight reel
I think we can all agree that 2020 had more than its share of challenges. It will go down in history as one of the worst years of most people’s lives, I think. But I do think it’s important to take note of the good things that happened on both a large and small scale. As I do every few years, I’ve put together a highlight reel post for the year. This year, I felt particularly compelled to write this post to illustrate that as bad as the year was, for many reasons, I had much to be grateful for, and I hope you do too. Taking a moment to contemplate the good things that have happened can be really valuable.
Here are some of the highlights of 2020 for me and for Peace of Mind Organizing:
Daily yoga. After dabbling on and off with at-home yoga (via the wonderful videos from Yoga with Adriene) for about a year, a daily habit was cemented this year. I have done yoga each and every day since April 1. I adore Yoga with Adriene (here are nine reasons why). And I look forward to keeping the daily habit going in the coming year. The pandemic helped: because I wasn’t leaving the house in the morning to work with clients, I was able to create the habit of doing yoga at the start of my day, which turns out to be a great time for me.
I embraced YNAB and got control of my business finances. It may be paradoxical that the year where my income took a dive because of the pandemic was the year I was able to get control of my finances and get out of debt. (Almost…I have one or perhaps two more payments and I’ll be debt free.) The reason I was able to do it is the software and app You Need A Budget. (By the way, that’s a referral link. If you click on it and sign up after your free trial, you and I each get a free month.) As a YNAB enthusiast, I am thrilled to share with anyone willing to listen. I’ve been using YNAB for a couple of years for my business finances, but it was only in the last nine months or so that I got fully on board and started using it the way it is meant to be used. Combining YNAB with Profit First means that I not only pay my bills with ease, I pay myself and my taxes with ease and I have reserves. It feels like a miracle. Starting tomorrow, I’m going to be using YNAB to handle our personal finances as well!
We published an episode of our podcast each and every week. My friend Shannon and Wilkinson and I started our Getting to Good Enough podcast in June 2018. Today, we published Episode 136. Every Thursday morning, without fail, we’ve published an episode. A few (like today’s) have been repeats of episodes that we consider particularly useful. I’m very proud of the fact that we keep producing content and we keep enjoying ourselves along the way. The big bonus is that people are listening! In the past year alone we’ve had about 60,000 downloads.
My daily task management Trello board has kept me on task. For years, I’ve jumped from task management system to task management system in my attempts to stay productive. 2020 was the year that ended. Since May, I’ve been using Trello in a particular way that allows me to stay on top of what I need to do and feel rewarded for accomplishing what I get done. It’s my north star that I consult multiple times per day. I’ve over the moon about it. I’ve blogged about it twice, first in May in a post called Trello + automation = productive bliss and then again in August in The nitty gritty of my Trello daily task management board. After seven and a half months of daily use, my enthusiasm has not waned in the slightest for this particular system, which uses Trello’s Butler automation to put in front of me the things I need to do every day. (It uses so much automation that I have to pay $10 a month for a Business Class membership, but it’s well worth it.)
I spoke at RootsTech. Family Search, the genealogy arm of the Church of Jesus Christ of Latter Day Saints, puts on a gigantic genealogy conference called RootsTech each year for the last ten years. I’ve attended many times and co-presented in 2017. This year was special because I presented alone (a talk called The Imperfect Genealogist), my talk was attended by several hundred people, and it was my last trip on a plane. I returned home on March 2, just before the world turned upside down. I was especially delighted that RootsTech used a picture of me presenting on its Facebook page and in its call for presenters for the next year! I think it was because I was wearing my hand-knit striped skirt and because I was smiling (or perhaps laughing). Incidentally, RootsTech has gone virtual for 2021. If you’re interested in genealogy and haven’t yet signed up for RootsTech 2021, I urge you to consider it. It will be held February 25 to 27, 2021 and it’s free of charge!
I drove to Washington state. My father turned 90 on September 11, 2020, and I could not let him celebrate that milestone without me. But I wasn’t willing to fly and risk bringing the coronavirus to him. So I drove, 2,000 miles each way. I just realized I never wrote a blog post about planning that big trip, but here’s a post about the great gift I gave him. I’m very proud of myself for making that drive on my own, and for planning it well so that I felt safe. And I’m delighted to report that it was very enjoyable, despite the hovering danger of COVID. I traveled in September, just before the surge that hit the Great Plains states that I traveled through. I had a really good time driving by myself for about 30 hours in each direction. It was a very special opportunity and I’m glad I took advantage of it. (There are now only two states I haven’t been to: North Dakota and New Mexico.)
I helped get out the vote. Back in 2018, I started writing Postcards to Voters, urging registered Democrats to vote. I kept going with the writing and have now written 2868 cards. I also became a notary specifically so I could notarize absentee and mail-in ballots in Missouri. It felt really great to channel my political concerns this way. And of course a highlight of the year for me was that the candidates I supported for president and vice president won.
I implemented some changes in business practices. The pandemic gave the little shove I needed to make a few changes with Peace of Mind Organizing. I’ve decided I will working less with clients in person (sending team members for hands-on work) and doing more consults virtually. This shift away from hands-on work goes hand in hand with shifting priorities that make me want to be home more. I’m excited to continue serving my clients even if I don’t get as much face time with them. I’m fortunate to have great team members who work so well with our clients.
I read 50 books. For the past five years or so, I’ve set a goal of reading 50 books in the calendar year. This is the first year I’ve achieved it (probably another accomplishment assisted by the pandemic). I keep a spreadsheet that I add to after I finish a book. I note the number of pages, so I can tell you that those 50 books added up to 18,204 pages.
I’m wearing the same dress for 100 days! It’s crazy to be so excited about this, but am absolutely loving the 100 day dress challenge that I’m currently taking part in. I’ve worn my Rowena swing dress from Wool& each day since December 4 and look forward to wearing it all the way to March 13!
25 days (so far) of wearing the same dress

As I mentioned here about three weeks ago, I am participating in a 100-day dress challenge from Wool&, the maker of wool-blend dresses that has challenged people to wear one of their dresses for 100 days straight. Those of us who do will receive a $100 gift card toward the purchase of another dress at the end of the 100 days.
I started the challenge the day after my Rowena Swing Dress arrived. Day 1 was Friday, December 4. So far, it has been such a fun challenge. I love that I don’t have to think hard about what to wear; the only decision involves if I want to dress it up or dress it down. The dress so comfortable. And it has pockets!
In the 25 days, I’ve worn it with fleecy pants underneath and I’ve worn it with tights and boots. I’ve recently embraced adding a belt; I love the way the belt makes the skirt flair and it dresses the whole thing up a bit.
You might be wondering about washing a dress I wear every day. This dress is a wool-nylon blend that is odor- and wrinkle-resistant. (It’s 78% merino wool and 22% nylon.) It’s machine washable and the care instructions call for line drying. I have washed it only once in the 25 days, back on Day 11 after I had an unfortunate encounter with some leftover rice I was trying to put into a storage container. I wear it over a long-underwear top or a t-shirt or turtleneck. And I now wear an apron when I cook or am doing dusty decluttering. (I haven’t done any hands-on organizing with clients in the last 25 days, but I’ve done a lot around my house.) That’s allowed the dress to stay quite clean and odor-free. I hang it over a hook in the bathroom each night while I sleep to air it out. Less laundry is part of the appeal of the challenge!
The first weekend, I cleaned out my closet of anything that I didn’t think would go with the dress, putting those items in bins in the basement. Over this past weekend, I went back through and selected a few more items (like the jacket I’m wearing today…see the photo above). I feel I have plenty to wear and I no longer feel disheveled and schlumpy like I’d been feeling before I got this dress. (If you’re curious, you can listen to Episode 134 of our podcast Getting to Good Enough, where Shannon and I talk about pandemic clothing quandaries and I express my dissatisfaction with how I was dressing. Shannon is the one who told me about the 100-day dress challenge.)
I joined a Facebook group for people doing the challenge where I see how other people are styling their dresses. It’s a lovely, positive group and I’m enjoying it so much.
When the 100 days are over, I can’t wait to pick out a new dress to use my $100 credit. This time, I’ll probably go for one that’s not black. But I don’t for a second regret my decision to go with nice, neutral black. In case you’re considering the challenge, I’ll mention that I went with the Rowena swing dress (short) in a size XS. I’m 5’3” and weigh 120 pounds. Right now it’s sold out, but you can pre-order one or select another style.
If you’re intrigued, I urge you to give it a try!
Taking a day (or two) for planning
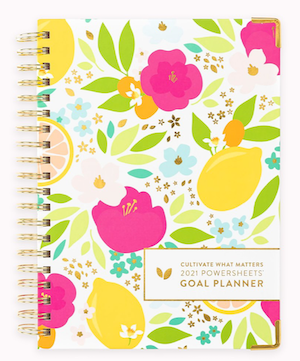
Every year for the past decade or so, I take a day this time of year to reflect on the past year and plan the coming year. I call it my personal retreat. (Here’s the post I wrote in 2017 about my retreat). Before this year, I would go from place to place around town (coffee shops, the library, the botanical garden, the floatation tank) for various of my planning. It was solitary and it was fabulous.
This year is different, of course. Thanks to COVID-19, I’m not venturing away from home except when necessary. So it’s up to me to translate that practice to my home. I actually started last week. I took out my Power Sheets Intentional Goal Planner (which I also used last year) and started the process outlined there. I got through the reflection part and set my word of the year. (It’s ease.) I was about to start the part where I set interim goals and put together an action plan to achieve them when I had to stop.
So today is Day Two and I’m excited. I have plenty of rooms in my old house. So I think I’ll plan to move from room to room for different activities (after I finish things like blogging, genealogy research and yoga). Here are some of the things I’m planning for the day:
- Create interim goals and action plans in my Power Sheets
- Take the Clifton Strengths Assessment, which we will be discussing this in an upcoming episode of our podcast Getting to Good Enough.
- Reflect on systems and processes I might implement to make 2021 more full of ease
- Letter a pretty sign containing my Word of the Year for my bulletin board
I’m going to sprinkle the day with some rewards for focused activity (like watching this Vogue interview of Dan Levy and taking a short walk to a neighborhood restaurant to pick up the festive holiday dinner we ordered). And I plan to be kind to myself, upbeat and productive.
2020 is a year like no other. It might be tempting to shove it aside and not reflect on the good things that happened and the lessons learned in a year of unprecedented stress. Speaking for myself, there was much good that happened this year and much that I’m proud of. Taking the time to reflect on that and incorporate it into my planning for what I hope will be a less stressful and more normal new year feels like the right thing to do this year.
If you’re able and inclined, I encourage you to carve out some time and space before the end of the year to reflect and plan. It can be an enjoyable exercise that pays off in the future.
Worth repeating: Six things my puppy taught me
Our standard poodle, Bix, joined our family as an eight-week-old puppy five years ago this week. I’ve been enjoying the puppy pictures that Facebook Memories has been presenting. And I enjoyed re-reading this post from five years ago. It seems like a lot of friends are getting puppies these days, so I thought it might be useful to run again. Bix has grown up into a beautiful, playful and very well behaved boy. He’s a keeper!

Happiness is a warm puppy
My thoughts are all wrapped in my dog these days. We brought our standard poodle puppy, Bix, home from the breeder two weeks ago. He’s now ten weeks old and commands most of our attention. Emails have gone unread and unwritten. Blogging has slowed way down. I feel behind in everything.
But I have a warm snuggly puppy and it’s worth all the effort. (That’s Bix in the photo at right snuggling with his dad.) This morning, as he and I had a quiet moment together on the couch, I jotted down a few things that this time with Bix has taught me. He’s not my first puppy, but he is my first puppy since I’ve become an organizer and blogger. I’m in the habit of turning everything into a blog post. So here you go.
Six things my new puppy has taught me to do
- Be patient. Oh my goodness. I think of myself as a patient person. I can stand in silence for minutes as a client ponders whether to keep or donate an item. But Bix is taking my patience to a new level. It’s been pouring rain for days and Bix is still being house trained. Waiting in the rain for my dog to eliminate requires an exquisite amount of patience.
- Be attentive. One has to pay attention to an unhousetrained puppy or one cleans up a lot of messes. Also, puppies chew stuff up. So when I’m with Bix I need to be focused. When I focus instead on my phone, I usually am sorry. (In fact yesterday I was focused on neither of them and he started chewing on my phone!)
- Look for the positive. Puppies are a clean slate. They need to be taught which of their natural behaviors are desirable and which are not. I practice positive-reinforcement training so I have to stay attuned to those things he does so I can reward him for it. (I realize I should be applying this to my interactions with humans as well!)
- Be prepared. When you have to be ready to take a puppy outside at a moment’s notice and it’s winter, you have to be prepared. That means my coat is at the ready, clicker and treats in pocket. I try to have a toy handy at all times to give to him when he tries to bite my fingers (and other body parts). And I always have a clicker and treats in my pocket for a quick training session or just to reinforce something great he’s doing. And, of course, I try to have my iPhone handy to capture the cute moments!
- Prioritize. My husband, Barry, and I share puppy duties. (Barry works from home.) It seems like all I have are small snippets of time that I must make the most of while Bix sleeps or Barry is entertaining him. The fact is that all I really want to do is post pictures and videos of Bix on Facebook and read the admiring comments, but really I need to prioritize the things that are essential to keeping my business running (like communicating with clients and team members).
- Stop and enjoy the little things. Puppies are young only once. And they’re outrageously cute. It’s easy to get frustrated but, really, there is so much to enjoy. Like snuggles. Like the sight of a puppy running toward you with a ball in his mouth. Like the first time he walks up the stairs by himself. This time with him is precious and I’m focusing on creating lasting memories.
Sign up for Yoga with Adriene's next 30-day yoga journey!

I’m a gigantic fan of Adriene Mishler, the amazing woman behind Yoga with Adriene. I started doing her free YouTube videos two years ago, on December 12, 2018. ( Just five days later, I blogged about how I got past my barriers and got started in my post Starting yoga where I am.) I’ve written a number of posts about how great this yoga practice is for me. (Here’s one of my favorites: Nine things I love about Yoga with Adriene.)
I was really excited yesterday when Adriene announced her next 30-day yoga journey. She does this every January. It’s a 30-day practice, one video released per day, created around a theme. I loved January 2020’s Home practice so much I did the whole thing twice (or was it three times?). The 2021 theme is Breath. That’s something we can all benefit from focusing on and I’m sure it will be hugely beneficial during this time of transition.
One of the things I love about the 30-day yoga journeys is that I don’t have to make a choice about which yoga practice to do. (When I’m not doing a 30-day program, I feel free to pick and choose among Adriene’s vast library of videos.)
I’m proud to say that I’ve developed an ingrained daily at-home yoga practice. I haven’t missed a day since April 1, 2020. Being home so much has helped me find time and, perhaps more importantly, find the time of day that’s best for me. (I do it after I’m spent some time at the computer in the morning and before I walk Bix.)
I’m very excited about the upcoming 30-day journey. Whether you’re new to yoga or an experienced yogi (or anything in between), I encourage you to check it out and sign up! Like all her videos, it’s free of charge.
P.S. In case you’re interested, here’s a wonderful profile of Adriene that appeared in the New York Times several weeks ago.
Find me on Rd.com and Porch.com!

Last month, my organizing advice appeared in two articles in the same week. The first was on Readers Digest’s website, in an article called 12 Things Professional Organizers Declutter Every Day. I was specifically asked about things I do in my own home, so this is truly real-life advice. (I talked about laundry, email, kitchen countertop and desktop.) My friends and colleagues Ellen Delap and Kathy Vines also contributed to this piece.
In addition, I was part of a round up of professional organizers on Porch.com in an article called, Home Organization: Tips from Professional Organizers. This time some 40 professional organizers provided tips on 40 different organizing challenges. My contribution was my answer to the question “What are the best apps to help you get organized?” This robust article is chock full of information. Ellen and Kathy are included in that story, along with a lot of other great organizers.
I urge you to give them a read. There’s so much great information shared in the articles!
Links
- Getting to Good Enough podcast
- Ravelry
- Peace of Mind Spending
- National Association of Productivity and Organizing Professionals
- Shannon Wilkinson, life coach
- Are you interested in becoming a professional organizer?
- Institute for Challenging Disorganization
- Organize Your Family History
- NAPO St. Louis

