No excuses series (part 2): "I paid a lot for that item"
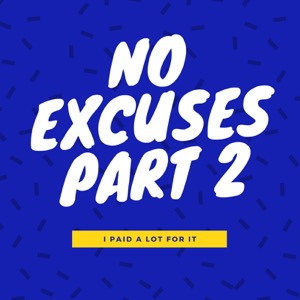
This is the second in a three-part series of posts about the three excuses we frequently hear from clients for wanting to keep items they no longer use or love. The series originally ran in January and February 2017 and I rerun it periodically because we’re still hearing these things. Here’s a link to part 1. Stay tuned for part 3 in the coming weeks.
The second most common excuse we hear from clients who want to keep something they don’t use of love is that they paid a lot for that item. I get it. It feels terrible to let go of an expensive item that turned out to be a foolhardy purchase. But you know what? Keeping it doesn’t make you feel any better. In fact, when you see the item, it just makes you feel worse.
There are two important things to remember when you’re tempted to keep an item you don’t use or love just because you paid a lot for it:
- The money is spent. Keeping it won’t bring it back. Selling it will recoup some of the money. And donating might get you a tax deduction. Keeping it doesn’t help.
- There’s a cost associated with keeping items that you don’t use or love, especially if clutter is an issue in your life. There’s an emotional cost (that reminder of your bad purchasing decision); there can be a physical cost if the item contributes to clutter that poses a tripping hazard or you’re unable to clean because there’s so much clutter; and there can be a financial cost if there’s so much clutter that you have to rent a storage unit or you can’t make repairs or do maintenance in your home.
For those expensive items you don’t use or love, I suggest pulling off the Band-aid. Take a deep breath and decide to let it go. If it’s easy to sell it, do so. Otherwise, donate it or make yourself feel better by giving it to someone you love. I’m pretty sure it will be a relief to get that thing out of your home!
No excuses series (part 1): "But I might need it!"
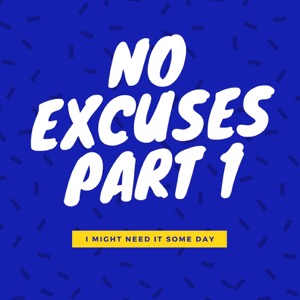
This is the first in a three-part series of posts about the three excuses we hear most frequently from clients for wanting to keep items they no longer use or love. The series originally ran in January and February 2017 and I rerun it periodically because, believe me, we’re still hearing these things. Stay tuned for parts 2 & 3 in the coming weeks.
When we work with clients on decluttering, we discuss their goals and motivations for letting go of excess. They understand that it makes most sense to hang on to meaningful items, not those that they’re not using. Yet it’s not unusual for a client to want to keep an unused item that’s perfectly good because “I might need it some day.”
We usually push back, particularly if we’re dealing with severe space constraints and the need to let go of a lot of stuff.
Here’s what we say to those clients when we hear, “But I might need it some day.”:
- How likely is it that you’ll need it?
- If you decide to let it go and you do find you need it, are you able to get another one?
- If you keep it, will you be able to find it when you need it?
That last question is important, because if a client is keeping a lot of those “some day” items it may be difficult to organize the stuff they keep in a way that will allow them to find everything.
Here’s the thing about perfectly good items that aren’t being used. If they’re perfectly good, somebody else can use them. Rather than having them sit idle, taking up space, it’s better to contribute to the greater good by donating them and letting them be used. If you hang on to them until a future decluttering session and then decide to let them go, they may be less valuable or useful to others.
Basically it comes down to a couple of things:
- Your goals for decluttering and getting organized. If you’re trying to create space in your home and life so that you can find what you want when you want it and live with ease (my definition of organized), then storing a lot of unused stuff might well get in the way of that.
- A fear of regret. I think a lot of us live in fear of regretting our decisions. If you do find that you let go of an item that at a future date you could have used, you may feel a twinge of regret. But you’ll get past it. Crowding your space with unneeded items is a pretty high price to pay to ward off future regret, in my opinion.
I have seen over and over how living with less makes one’s life easier (and I’ve experienced it in my own life). A great first step toward living with less is letting go of the perfectly good stuff you don’t use.
Stay tuned for parts 2 and 3 of the No Excuses series: “I paid a lot for it” and “It was a gift.” I’ll post them over the next two weeks.
Retiring the New Organizer Guides
When I created my Insider’s Guides for New Organizers in 2017 and 2018, my hope was that they would support people who were just getting started in the organizing industry. They answered the questions I had when I started my business in 2005. Over the years, I’ve been glad to know they’ve helped new organizers along the way.
At this point, though, I’ve decided it’s time to retire them. I’m no longer updating them, and I’m ready to let them go.
So through April 15, 2026, the full New Organizer Bundle is available for $20 (that’s half the regular price). After that, it will no longer be available.
If you’re in the early stages of your organizing business, know someone who is, or have been meaning to take a look at these guides, this is the last chance to get them.
I appreciate everyone who has supported this little corner of my business over the past five years!
My hands-down favorite bullet journal
I’ve been bullet journaling since January 2022. I use my handy journal to write down everything that happens in my day. I use it for my task list and to capture any information that I don’t want to forget. (Click here for links to more of my blog posts about bullet journaling.)
I’m so glad I started bullet journaling when I did because it helped me keep everything together when I had to move my dad into assisted living and sell his house. After he passed away a few months later, my bullet journal helped me keep track of all the information about his estate. (I was the executor.) I did not have another system in place that would have handled all that information as well.
I kept on with the bullet journaling and it came through for me again in 2024 when my husband and I decided to sell our house and move to an apartment. My bullet journal allowed me to capture all the information needed to downsize our belongings and move and then renovate and sell our house. I took care of the bulk of that while my husband was in the hospital for nine weeks getting a new heart. I’m telling you, there was a lot of information to keep track of. The bullet journal kept me sane.
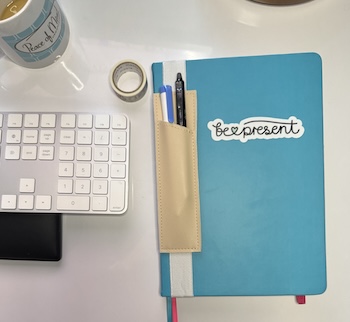
When I fill up on journal, I start another. I’m currently on my 20th bullet journal. It took me ten tries to identify a journal that I really love and my most recent ten are all the same (with different colored covers). I wanted to share the details of that journal for the curious because my love for them has not lessened in the slightest.
My bullet journal of choice is the B5 Dotted Journal Pro from Scribbles That Matter. I prefer the 120 gsm paper weight.
Why do I love it? For so many reasons:
- The 120 gsm paper is heavy enough to prevent ink from bleeding through but not so heavy that the journal itself is hard to carry around.
- The B5 size (7 inches x 10 inches) is spacious enough for me to write freely without feeling cramped.
- The subtle dot-grid pattern helps me write in a straight line but doesn’t hem me in.
- It has page numbers.
- There are four pages at the front with a pre-printed form for an index, a critical component of using the journal
- It has a nice leather-like hard cover and opens flat (and stays open).
- It comes in lots of fun colors.
Each of my otherwise identical journals has a different colored cover (though I’m starting to repeat colors) and I put a fun sticker on the cover of each. I keep a running note (in Apple Notes) with a timeline of the journals so I can easily pull the right one (identified by color and sticker) off my shelf.
These 215-page journals are not inexpensive—$35 each when bought on Amazon. But for me they are well worth the cost.
I have not been tempted to look beyond Scribbles That Matter for my next journal. In fact, I’m relieved that my search is over. If you’re a bullet journaler (or an aspiring one), I urge you to give this one a try! If you want more info on my bullet journal supplies, check out this post from 2025 on my other go-to BuJo supplies. If you’d like to learn more about how I bullet journal (everyone does it differently), check out my 2025 BuJo series.
Worth repeating: Furthering your goals one tiny step at a time
I originally wrote this post just over a year ago. I’m happy to say I’m still working with my trainer every week and I’m growing stronger! I’m also happy to report that opening the door myself instead of pushing a button is one small behavior change that’s now fully entrenched. I love tiny changes like this that make a difference so I thought I’d share this post again.
I’ve been trying to exercise more and build strength, balance and flexibility. I’ve hired a trainer, who has been really helpful. But I’m also on the lookout for small changes I can make that will contribute to that goal.
I created one for 2025 that’s been amazingly easy to implement and that I hope will make a difference:
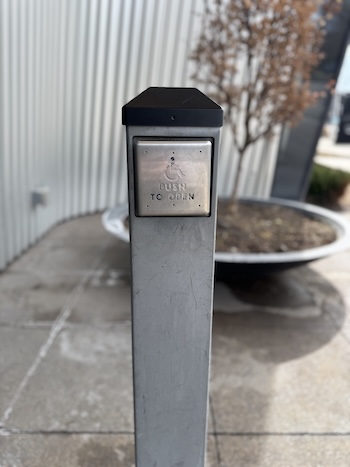
I stopped using automatic door openers.
I live in a high-rise apartment building and, naturally, there are buttons to press to open the building’s heavy doors to the outside and to the elevator lobby. (They’re intended for people with disabilities to use.) Going in, you hold your fob to the lock, then when the light turns green, you can push a button that will open the door. Going out, it’s the same thing but you don’t have to use your fob.
I decided at the beginning of the year to pull or push open the doors, rather than pushing the button. There are, I think, six doors in our building that have automatic openers. When I first moved in, I would push the button without thinking about it. Now I never use it. I can’t help but think that using my arm muscles this way six or eight times a day will help me become more fit!
The thing that amazes me is how easy it was to make the change because it’s such a small thing. It was more of a mindset shift than anything.
Are there tiny things you could do to help further your goals? Maybe it’s parking further away from the store to get more steps in. Or taking the stairs instead of the elevator.
Or maybe it’s putting your keys in a designated spot each time you enter your home so you don’t have to look for them when it’s time to leave. Or putting your dirty clothes in the hamper, rather than leaving them on the floor. That’s a small thing that can make a big difference.
I encourage you to keep your eye out for little changes you can make in your daily life to help you reach your goals more easily!
Getting to Inbox Zero (again)

I tend to consider myself someone who’s good about staying on top of email. (I’ve certainly blogged about it enough.) But in 2026, I’ve let the email in my peaceofmindorganizing.com email inbox pile up. (I use an iCloud address for shopping and other personal things and I don’t mind that it’s always voluminous.) I think part of the problem is that I’m doing a bunch of administrative work around implementing a new costumer relationship management system for the business and my brain is fried by the end of the day. And then, of course, the bulging email box feels overwhelming.
But today I decided to get serious about it.
I wrote on my task list, “Spend 30 minutes on email.” I started the day with 331 emails, 165 of which were unread. My goal was that by the end of the 30 minutes, I’d have fewer than 20 emails in there. (I read and process my email in my MacBook’s email client.)
Here’s how it went:
- I set a timer for eight minutes. Then I sorted my messages by sender. That allowed me to do some bulk deletes, like the many-times-a-day emails I am sent by the Washington Post. I’m not great about deleting those in real time. So in my first eight minutes, I deleted a ton of messages pretty easily. At the end of those eight minutes, I had 131 messages left, 29 of the unread.
- I set a timer for four minutes and continued going through my inbox. I deleted and archived a lot of messages. At the end of the four minutes, I had 47 messages, none of them unread.
- A little while later, I tried again, setting my timer for four minutes. By then, some emails had come in, so my starting point had gone up to 52 messages. These messages were tougher—they actually required some effort. They either needed a response or they served as reminders for actions I needed to take. So I only whittled my box down by 6 messages in that four-minute burst, to 46 messages. (But I got stuff done that had been languishing!)
- I stepped away for a few hours and when I came back, I set my timer for 10 minutes. (I forgot to look at the new starting point.) At the end of the 10 minutes, I was down to 21 messages.
You may recall that my goal had been 20 messages so I almost stopped there. But 21 isn’t 20 and I decided to spend a little more time and close to zero I could get it.
I didn’t set a timer and I don’t know how long it took (maybe 15 minutes?), but I got my inbox down to ZERO messages! Break out the champagne! Now that I’m at ground zero it will be so much easier to keep up.
To recap, in 26 minutes of focused effort today, I reduced my inbox from 331 messages to 21 messages.
And then I went ahead got rid of the rest.
For me, the real key to dealing with accumulated emails is sorting by sender because it makes it so easy to bulk delete or archive messages. And of course this is a great opportunity to unsubscribe from newsletters that you don’t read. I did some of that too.
I don’t think Inbox Zero as a daily practice is sustainable for 2026 me. I did it for months back in 2011 and maybe I’ll surprise myself. In any case, I’m hopeful that the effort I made today will motivate me to at least delete the low-hanging fruit every day.
Compensating for a fading memory

I miss my excellent memory. When I was in my twenties, I had a mind like a steel trap. Oh, the things I could keep in there and recall in a nanosecond! It made me a valuable employee and my ability to keep details straight and handle logistics well allowed me to work on some great projects. For example, I organized—and attended—a small conference in Kenya with participants from all over the world. I organized it from my office in Washington, D.C.. And I did it without the internet. It boggles my mind.
I was 42 when I started Peace of Mind Organizing in 2005 and now I’m 63. Believe me when I tell you that I’ve had to come up with ways to compensate over the years for the fact I’m not able hold a zillion facts in brain like I used to. So what do I do? I ease the stress on my brain by not even trying to remember.
Here are some of the tools I use instead of relying on my memory:
- I’d be lost without my Bullet Journal. I keep task lists and chronological notes about everything in it. And I update an index in the front of each journal every week to make it easy to find my notes.
- For money-related questions (like “what did I pay for that thing?” or “did I really subscribe to that app?”) I can count on YNAB the amazing spending app that I update daily. FYI, that’s a referral link; if you click on it and end up subscribing, we’ll each get a free month added to our description.
- I put all my appointments in my electronic calendar on my Mac (which syncs with my iPhone). I can’t even imagine trying to keep track of my schedule in my head!
- I find myself consulting emails and text threads to remind myself of communications. It’s one reason I prefer email or text to the phone—it means I don’t have to rely on my memory of a conversation.
- I set alarms a lot on my phone. For me, alarms have more impact than reminders. If I need to reach out to somebody in an hour (or in a few minutes), I will set an alarm (with an appropriate label) rather than just try to remember. My husband and I drive an electric car and there are only two chargers in our apartment building. So it’s important for us to move the car from the charger in a timely manner. The alarm is a life saver!
At 63 though I’ve become more forgetful, I’m still going strong. Thanks to these tools, I’m doing great. I’m not going to lie: I do miss the amazing memory I used to have. But I also cut myself a lot of slack. I’ve earned the right to ease up on my brain and be kind to my mind!
Search
Recent Posts
- My latest productivity boon: The Big Three
- Meet my newest employee!
- Worth repeating: My perfect Bullet Journal pen
- My very first post on perfectionism
- Get 30% off Elfa at The Container Store until February 16
- My 2026 Word of the Year: ENJOY
- Worth repeating: Alternatives to gift wrap
Tags
About Janine

Hello! I’m Janine Adams — a certified professional organizer based in St. Louis, and the creator of Peace of Mind Organizing®.
I love order, harmony + beauty, but I believe that the way that you feel about yourself and your home is what truly matters.
If you’re ready to declutter with a purpose and add more ease to your life, you’ve found the right blog — and you’ve found the right company.
read more »Links
- Getting to Good Enough podcast
- National Association of Productivity and Organizing Professionals
- Shannon Wilkinson, life coach
- Institute for Challenging Disorganization
- Organize Your Family History
- Ravelry
- Are you interested in becoming a professional organizer?
- NAPO St. Louis
- Peace of Mind Spending